| Split Window Beetles |


I bought this 1953 deluxe split window Beetle for the grand total of $150. I did start to strip it down, but then realized that it needed a
lot of work. It had been rolled and needed a new roof. You can see in the photo on the left that the whole left side of the car sat
lower than the right. I kept it for a year and then sold it for $1000.
lot of work. It had been rolled and needed a new roof. You can see in the photo on the left that the whole left side of the car sat
lower than the right. I kept it for a year and then sold it for $1000.


I missed having a split, so I began looking for another in 1981. I bought this 1952 from my friend Jim Bang. Jim was working for Auto
Haus in San Bernadino at the time. The car had previously been owned by Shaky Jake. I had Toyota do the body work, although the
car was in very good shape. Believe it or not, this car was my daily driver for five years. I drove it from San Bernadino to Long Beach,
which was a round trip of 140 miles, and it had a 36 HP engine. The bottom photos were taken at one of the Bug-In's. I was the first
one there to begin setting up for the car show. I sold the car to Tony Hutchinson of Christchurch, New Zealand for $6500.


| 7 8 9 10 11 12 |
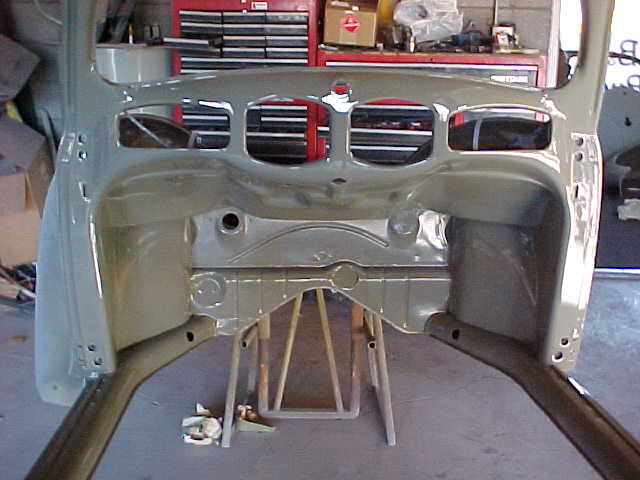
I decided to buy another split and this time I would restore it to original pristine condition. I bought this 1952 from Dick Christensen in
1998 for $1500. As you can see, it was just a shell, but I knew it would one day be a real beauty. Photos 1-3 are of when I took the car
to the sandblaster. In photos 4-6 the car is going to the body shop to receive the final body work and to be painted. The final prepping
was done on the body prior to the first coat of primer, which can be seen in photos 7-10. In photos 11-13 you can see the car after it
had received three coats of primer. Next the car would be wet sanded to get it ready for its first few coats of paint
| 13 14 15 16 17 18 |
| 19 20 21 22 23 |


| 25 26 27 28 29 30 |
| 31 32 33 34 35 36 |


| 37 38 39 40 41 42 |
| 43 44 45 46 47 48 |


| 49 50 51 52 53 54 |
| 55 56 57 |


The '52 get its first coat of paint as seen in photos 15-19. The final coat goes on in photo 20. It is going home to complete the
restoration and you can see this in photos 21 & 22. Photo 23 is of the ID plate showing the model number, body and VIN number.
The car was being reassembled as can be seen in photo 24.
restoration and you can see this in photos 21 & 22. Photo 23 is of the ID plate showing the model number, body and VIN number.
The car was being reassembled as can be seen in photo 24.


Photos 25 & 26 shows the steering wheel installed and the shifter and the carpeting being installed. Photo 27 gives a view inside the
glove box liner, with the clock and speedometer pod installed. Here are the luggage rack rails and the carpeting. (photo 28). You can
see the hood release and the cable pedal assembly installed in photo 29. Photo 30 is a closer shot of photo 27. The front seats are
installed (photo 31). The interior was done by Lenny Copp of West Coast Classics. The door panels, door handles and the window
crank can be seen in photo 32. Here is a close-up of the glove box (photo 33) and inside the glove box (photo 34) is the clock windup
knob, which is a 15 day windup. The clock (photo 35) was restored by Hollywood Speedometer in California. I also painted the bezel
to match the pod. The standard model didn't have sliding rails, they were held on by wing nuts (photo 36).


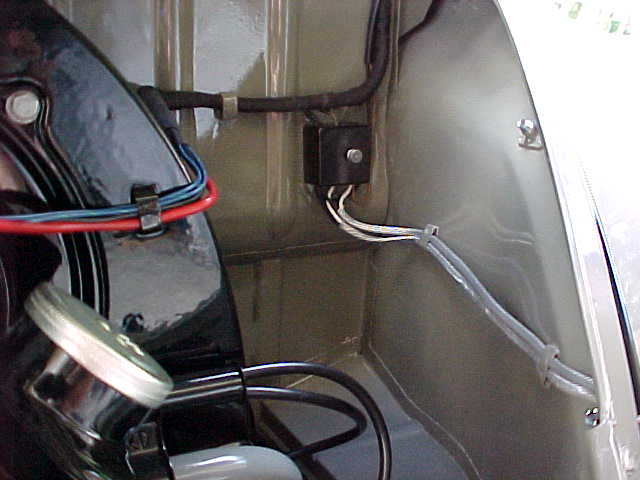


Photo 37 shows the door straps and the door hinge plugs, which are the original parts for this car. In photo 38 you can see an original
early 50's headlight lens, which was brought over from Germany from a friend who was visiting the States. These are the original
headlights for an early model Beetle. The gas tank was blasted and acid washed as can be seen in photo 39 and it was also primered,
painted gloss black and clear coated. The gas cap on the early models was steel, not aluminium polished, and they were silver in color.
This gas tank is for 1950-52 Volkswagens only, some of the 1952 Beetles used the same size gas tank, but with a smaller neck size.
Photo 40 shows the taillights I got from Dick Christensen; they are NOS with glass lenses. The pope nose (photo 41) was also
purchased from Dick Christensen, who is a well known collector in Arizona. If you look close, the VW logo can be seen on the tip of
the pope nose. The proper position for the rear engine lid handle (upward position) can be seen in photo 42. The car is waiting for the
engine to be installed in photo 43. Photo 44 shows the license plate light and the brake light wire harness positioning. The two wires
that you see on the side of the engine compartment in photo 45 is the proper wiring for early models (silver braided). Also, a 3-fuse
holder in the foreground can be seen. Here in photo 46 is the engine installed with an original coffee can air cleaner, a flat top
distributor (BRS 383), and the oil filter tube and bracket Photo 47 shows the proper front hood bracket with three mounted bolts on
each side. You can see the front and rear rib bumpers installed in photo 48 and for now I am using 15" wheels, but I am looking for
16" rims and bias ply tires with tubes.


The '52 is waiting for the running board installation and fine tuning in photos 49-51. I used original windshield weather stripping as
well as rear window and side window weather stripping as can be seen in photos 52-54. These are not after market items. I had
collected these 20 years ago and was waiting for a project such as this to use them. I used NOS passenger and driver door handles and
these can be seen in photo 55. The original aluminium front hood handle can be seen in photo 56. Photo 57 is a view of the
transmission all in pieces.
The car looks as I once envisioned it and is indeed a real beauty in pristine condition. It has won 18 awards at car shows and is quite
an attention grabber when it is on display. It has been featured in Hot VWs, VW Trends, Super VWs and VolksWorld. This is one car
I will keep.......unless an offer comes up that I can't refuse. Oh, I almost forgot, my wife says I am not allowed to sell this car. She says
that all she heard before I bought the 1951 was how much I wanted a split. Well, I sold that one and again talked constantly about how
much I wanted another one. I finally bought the 1952 and she says this one isn't going anywhere! In fact, she suggested putting the '52
in the living room. That is where it now resides and I must say it is unique. You can see photos of it on The Museum page. It was
quite a project, but I am sure you will agree that it was well worth it.
| 1 2 3 4 5 6 |
| Home About Us Bug-In Photos Contact Us Frenchy Interview Index Links Magazine Articles Race Cars The Museum The Original Shrine The Shrine #2 |
| 24 |
| (Click on the photos for a larger view.) |