| 1965 Volkswagen Beetle |
| 6 7 8 9 10 |
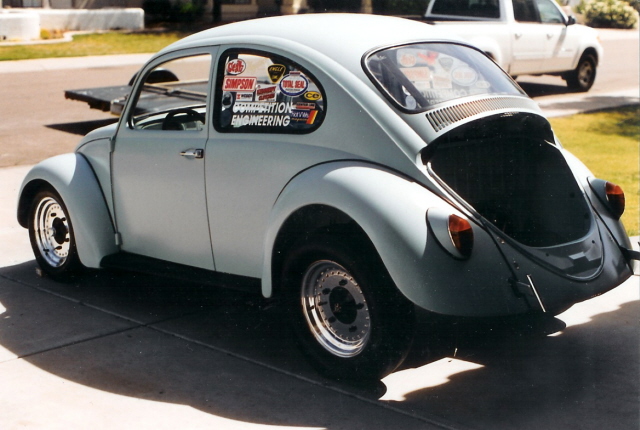
I saw the car on the samba and bought it for $600 from a guy who lived in Riverside, California. All of the body work was done by
Kevin of Phoenix. He didn't use any bondo. It was mostly all metal finished. I decided to paint it a new Beetle convertible color,
Aquarius blue. I had a new windshield installed and good, used right and left window glass. All new weather stripping was used
throughout the car. New door handles were installed. The headlight rings were rechromed and new taillight lenses were added. I put on
new German running boards. One of the features is four new Center Line wheels. The two rear wheels were specially manufactured per
my specifications through my friend Darrell Baker, who knows management at Center Line. Photo 2 displays window stickers; I wanted
to use stickers from the 70's, as my idea was to build the car to look like race cars from that era. Photo 3 shows the car while awaiting
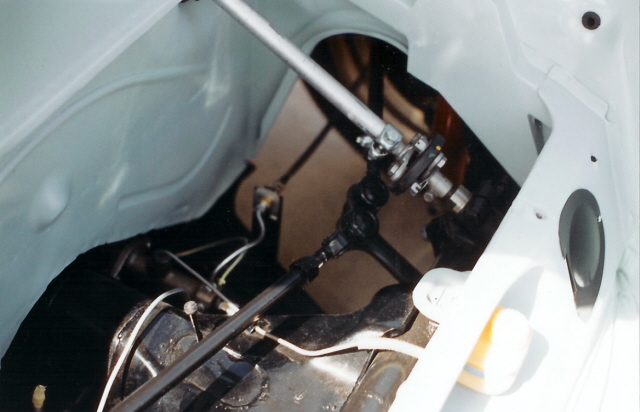
the 2109 cc engine.As can be seen in photo 4, the front beam was narrowed 4" and we had to box in the area for the front shock tower
to be hidden. In photo 5 you can see the Center Lines that were on my '54 oval and in place the '54 received bubble-style Center Lines.
Photo 6 shows a transmission that was removed from a previous project (an oval window) that I had, which I ended up selling to Buddy
Hale. Photo 7 shows a stock master cylinder reservoir that was used. No hood latch will be used for this project, I will be using a hood
pin. The horn grill on the drivers side can be seen in photo 8. This will be used for a tow hook. You can see the small detail under the
fuel tank area in photo 9. In photo 10 I am waiting for the headlight and running board installation.
I used a fiberglass seat as can be seen in photo 11. A row bar was made to fit the car, and this was made of Chromoly tubing. The row
bar was welded onto the body, as opposed to being welded to the pan, because this would make it stronger and safer. Photo 12 shows
the removable rear apron we made. Zeus fasteners were used to have easier access when installing and removing the engine. Matt Todd
from Phoenix built the hexagon T bars, which were polished and chromed. A Grant steering wheel was used and you can see it in photo
13. Photo 14 shows the pedal assembly that was installed with an aluminium gas pedal. Four inspection plates can be seen, which were
installed on the center tunnel for easy access to the clutch cable and also for the installation of the fuel line. Photo 15 shows the staging
brakes that were installed. In photo 16, you can see the 6-switch panel that was installed in place of the radio area: switch#1 is on/off,
#2 is magneto, #3 is for the headlight and taillights, #4 is the fuel pump switch, #5 is the blower motor, and #6 is the oil pressure
gage. Photo 17 shows the 76 mm crank shaft, which was purchased from Ken Lowry, an original Empi linkage, a Gene Berg oil filter
base mount, a DDS front pulley, 48 IDAs with 42 mm Venturi's, a tall Skat Trak manifold, a Type I engine case with Dean Lowry heads,
12.1 compression, straight cut gears, a lightened flywheel, a Kennedy stage II pressure plate with a Cush lock disk and an FK 89 Engle
cam, JC push rod tubes were used and cut to length with a Chromoly push rod, the engine size used for this application of a 76 mm x 94
mm=2109 cc. Photos 18 & 19 shows the fuel pressure regulator that was installed with an all stainless braided line for safety.
The car was displayed at Bug-In 32. It needs the main wiring, the fuel tank installed, a battery and it will be complete. I am also
considering selling it with or without engine. I would sell the car complete for $15,000 or without the engine for $7000.
Kevin of Phoenix. He didn't use any bondo. It was mostly all metal finished. I decided to paint it a new Beetle convertible color,
Aquarius blue. I had a new windshield installed and good, used right and left window glass. All new weather stripping was used
throughout the car. New door handles were installed. The headlight rings were rechromed and new taillight lenses were added. I put on
new German running boards. One of the features is four new Center Line wheels. The two rear wheels were specially manufactured per
my specifications through my friend Darrell Baker, who knows management at Center Line. Photo 2 displays window stickers; I wanted
to use stickers from the 70's, as my idea was to build the car to look like race cars from that era. Photo 3 shows the car while awaiting
the 2109 cc engine.As can be seen in photo 4, the front beam was narrowed 4" and we had to box in the area for the front shock tower
to be hidden. In photo 5 you can see the Center Lines that were on my '54 oval and in place the '54 received bubble-style Center Lines.
Photo 6 shows a transmission that was removed from a previous project (an oval window) that I had, which I ended up selling to Buddy
Hale. Photo 7 shows a stock master cylinder reservoir that was used. No hood latch will be used for this project, I will be using a hood
pin. The horn grill on the drivers side can be seen in photo 8. This will be used for a tow hook. You can see the small detail under the
fuel tank area in photo 9. In photo 10 I am waiting for the headlight and running board installation.
I used a fiberglass seat as can be seen in photo 11. A row bar was made to fit the car, and this was made of Chromoly tubing. The row
bar was welded onto the body, as opposed to being welded to the pan, because this would make it stronger and safer. Photo 12 shows
the removable rear apron we made. Zeus fasteners were used to have easier access when installing and removing the engine. Matt Todd
from Phoenix built the hexagon T bars, which were polished and chromed. A Grant steering wheel was used and you can see it in photo
13. Photo 14 shows the pedal assembly that was installed with an aluminium gas pedal. Four inspection plates can be seen, which were
installed on the center tunnel for easy access to the clutch cable and also for the installation of the fuel line. Photo 15 shows the staging
brakes that were installed. In photo 16, you can see the 6-switch panel that was installed in place of the radio area: switch#1 is on/off,
#2 is magneto, #3 is for the headlight and taillights, #4 is the fuel pump switch, #5 is the blower motor, and #6 is the oil pressure
gage. Photo 17 shows the 76 mm crank shaft, which was purchased from Ken Lowry, an original Empi linkage, a Gene Berg oil filter
base mount, a DDS front pulley, 48 IDAs with 42 mm Venturi's, a tall Skat Trak manifold, a Type I engine case with Dean Lowry heads,
12.1 compression, straight cut gears, a lightened flywheel, a Kennedy stage II pressure plate with a Cush lock disk and an FK 89 Engle
cam, JC push rod tubes were used and cut to length with a Chromoly push rod, the engine size used for this application of a 76 mm x 94
mm=2109 cc. Photos 18 & 19 shows the fuel pressure regulator that was installed with an all stainless braided line for safety.
The car was displayed at Bug-In 32. It needs the main wiring, the fuel tank installed, a battery and it will be complete. I am also
considering selling it with or without engine. I would sell the car complete for $15,000 or without the engine for $7000.
| 11 12 13 14 15 |
| 1 2 3 4 5 |
| 16 17 18 19 |
| Home About Us Bug-In Photos Contact Us Frenchy Interview Index Links Magazine Articles Race Cars The Museum The Original Shrine The Shrine #2 |
| (Click on the photos to see a larger view.) |